audera pro auditory brainstem test

Auditory Brainstem Response Test Troubleshooting

08/28/24

Performing an Auditory Brainstem Response (ABR) test can sometimes present challenges but understanding common troubleshooting steps can help ensure accurate and efficient results.

Here's a detailed guide on handling interference and impedance issues during ABR testing with the GSI Audera Pro. Most of these suggestions can be used with any ABR device.

While this blog focuses on the GSI Audera Pro, the tips provided apply to most ABR equipment we distribute, except for the Loop Test, which is specific to this device.

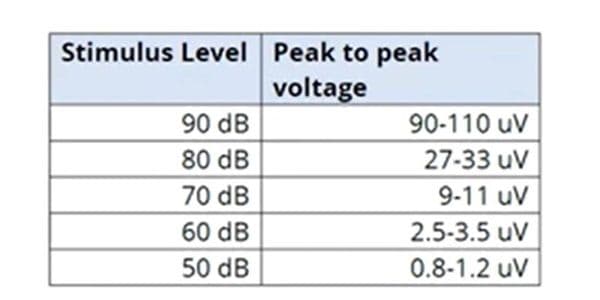
All evoked potential devices provide a way to evaluate the hardware to ensure it is functioning properly when not connected to a patient. The GSI Loopback Test is a diagnostic procedure used to verify the functionality and accuracy of GSI Audera Pro. This test ensures the system correctly records and processes signals.

  • Inconsistent test results for ABR or ASSR (Auditory Steady State Response) test types
  • Inconsistent test results between Channel A and Channel B
  • Excessively noisy recordings
  • Cyclical noise throughout the recording

To perform this test, you need the loop test cable, which comes with every Audera Pro device, and a special automated test protocol.

  1. Unplug the insert earphones from the back of the Audera Pro and plug in the loop test cable, matching blue to blue and red to red.
  2. Unplug the electrode/ patient cable and plug the other end of the loopback test cable into the same port.

audera pro loopback video

3. Create a patient name for troubleshooting purposes in your software, then open the Audera ABR module.

4. Navigate to the top left and click Protocol. From the drop-down menu, select Execute Automated, then select Loopback. The test will automatically begin on right ear, Channel A.

5. You should see a series of smooth sine waves on the screen as the protocol runs between 90 to 50 dB in 10 dB steps..

6. Repeat the same Protocol for the left ear after the right ear test. Navigate to the top left, select Protocol, then Execute Automated, select Loopback, open it, and complete the test.

7. Once the Protocol is complete, scroll to the bottom of the page and examine the peak-to-peak amplitude column. Refer to the table in the back of the Audera Pro user manual for acceptable peak-to-peak voltage ranges based on stimulus level. Compare your values to those in the table to ensure your device functions correctly.

ABR system functions table

By performing this test, clinicians can confirm that their ABR system functions correctly before conducting patient assessments.

If you encounter significant interference during ABR testing, the first step is to check the electrode impedance. Here's how to do it:

  1. Evaluate Impedance Levels: Ensure that the impedance reading for each electrode is below 5 k ohms and balanced. Minor variations, such as a difference of 2 k ohms, are generally acceptable.
  2. High Impedance Issues: If the impedance is high, such as 99 k ohms, it may indicate an electrode has fallen off or an issue with one or more of the electrode wires, leads or electrodes.
  3. Verify Electrode Connections: Double-check all electrode connections to ensure they are secure.
  4. Check Electrode Expiration Date: Verify that the disposable electrodes are not expired. Proper storage is crucial. Seal them in their packet or a Ziploc bag to maintain their effectiveness.
  5. To further troubleshoot, test the electrode lead wires if they are not connected to a patient. Drop the electrode leads into a cup of water and run an impedance check. The readings should be under 5 k ohms, confirming that the lead wires are not the source of interference.

Following these steps can minimize interference and ensure more accurate ABR test results.

audera pro interference video

When high levels of electrical artifacts are present during ABR testing, it is essential to consider environmental factors that might contribute to interference. Equipment like MRI machines or cardiac catheterization labs nearby can cause electrical interference.

Relocating your equipment slightly, by about six to ten feet, may help reduce this interference. Additionally, ensure that the wall outlet used is grounded. Consulting with an electrician to verify proper grounding and, if possible, using a dedicated outlet with a separate earth ground can significantly improve your results. Remember never use a power strip and plug your ABR device directly into a wall outlet.

Achieving clear results in evoked potentials testing depends heavily on minimizing noise. The environment and the patient's state play crucial roles in this process. Here are some general tips to help you optimize your test results:

  • Testing in a soundproof or magnetically shielded room helps reduce ambient noise.
  • Ensure your equipment including the laptop has a dedicated ground to minimize electrical interference.
  • Keep electrode and transducer cables separated to avoid cross-interference.
  • Turn off or disconnect any unnecessary lights or devices that may contribute to noise.
  • If noise persists, consider relocating the test to another room or adjusting the patient's position within the current space to avoid hidden sources of interference.

man lying down being tested on audera pro

  • Ensure the patient is relaxed, with closed eyes and relaxed facial muscles.
  • Have the patient lie down or recline comfortably to minimize movement.
  • If possible, testing while the patient is asleep can yield better results.

  • Clean the skin with an abrasive preparation gel to ensure good contact.
  • Attach electrodes tightly, making sure the edges are well-secured to the skin.
  • Once electrodes are in place, check the impedance level. Ideally, this should be 3kOhm or lower to ensure accurate readings.

Adjust the rejection level based on the amount of electrical noise and the patient's state. Lower rejection values are preferable as they reduce the amount of noise in the recorded signal. For ABR testing, a rejection level of around 40µV is often suitable.

By following these suggestions, you can effectively troubleshoot and resolve common issues encountered during ABR testing, ensuring accurate and reliable results for your patients.


To learn more about the GSI Audera Pro or to request a quote

Click Here

We’re here to help! If you have any further questions, please contact your local e3 Diagnostics office.

Contact Local Office


Follow us on Social!

fb_blue_30x30    linkedin_blue_30x30    youtube-logo


If you haven't already, make sure to subscribe to our newsletter to keep up-to-date with our latest resources and product information.